Common, lets jump straight into the Visualforce sea!!
You want to create your first VisualForce page? . Before that see this
Setup --> My Personal Information --> Personal Information --> Development Mode . This should be checked,if not set it to true.
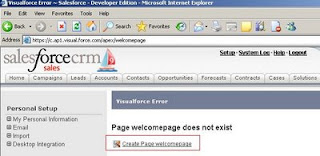
Once done, go to your URL bar ( see image ).

Modify the URL . Ex ( https://ap1.salesforce.com/home/home.jsp would be modified to https://ap1.salesforce.com/apex/welcomepage ) and hit ENTER.

When you see this screen, click on the "Create Page" link. And done, your page has been created and you will see an editor window at the bottom of your browser. You will see some code that has been generated by default. These are called tags.
<apex:page> is the very first tag you have to learn. You cannot create a page without this tag.
There are three main attributes for this tag.
Type this code in the editor (I know you would copy & paste) and hit SAVE icon. You can see that your new page is now developed. But wait, there doesn't appear a Account Name to edit and Save.
https://xxx.salesforce.com/apex/welcomepage?id=00190000002GA5n . Id should be a valid Account Id.
Dont be afraid that you have to modify the URL all the time, there is lot more to explore.
Controller (often called Custom controller) is used when you want to perform something extraordinary when hitting the "SAVE" button.
Here is a simple example using Custom controller ... Click here!!!
Extensions is used when you want to perform a combination of both ( Standardcontroller and Cutom)
We will dive deep into the Controller and Extensions attributes in the coming posts. But for now expand the basic code provided, add as many tags as possible and post your queries.
Some tags which come to my thought:
<apex:pageblock>
<apex:pageblocksection>
<apex:outputfield>
<apex:outputlabel>
<apex:commandlink>
Note: Use the Component Reference link in the editor window for more information.
You want to create your first VisualForce page? . Before that see this
Setup --> My Personal Information --> Personal Information --> Development Mode . This should be checked,if not set it to true.
Once done, go to your URL bar ( see image ).

Modify the URL . Ex ( https://ap1.salesforce.com/home/home.jsp would be modified to https://ap1.salesforce.com/apex/welcomepage ) and hit ENTER.

When you see this screen, click on the "Create Page" link. And done, your page has been created and you will see an editor window at the bottom of your browser. You will see some code that has been generated by default. These are called tags.
<apex:page> is the very first tag you have to learn. You cannot create a page without this tag.
There are three main attributes for this tag.
- Standardcontroller
- Controller
- Extensions
<apex:page standardcontroller="Account">
   <apex:inputfield value="{!Account.Name}"/>
   <apex:commandbutton value="Update" action="{!Save}"/>
</apex:page>
Type this code in the editor (I know you would copy & paste) and hit SAVE icon. You can see that your new page is now developed. But wait, there doesn't appear a Account Name to edit and Save.
https://xxx.salesforce.com/apex/welcomepage?id=00190000002GA5n . Id should be a valid Account Id.
Dont be afraid that you have to modify the URL all the time, there is lot more to explore.
Controller (often called Custom controller) is used when you want to perform something extraordinary when hitting the "SAVE" button.
Here is a simple example using Custom controller ... Click here!!!
Extensions is used when you want to perform a combination of both ( Standardcontroller and Cutom)
We will dive deep into the Controller and Extensions attributes in the coming posts. But for now expand the basic code provided, add as many tags as possible and post your queries.
Some tags which come to my thought:
<apex:pageblock>
<apex:pageblocksection>
<apex:outputfield>
<apex:outputlabel>
<apex:commandlink>
Note: Use the Component Reference link in the editor window for more information.
