Credits: http://www.jqeasy.com/
In some cases, you might want to display a character count to notify the user that they can enter only a certain number of characters in a text box in a Visualforce page.

There is a javascript file that you need to use to achieve the above behavior. The file was downloaded from jqeasy.com, i uploaded the file here in case you are not able to locate the file.
https://drive.google.com/file/d/0B5FQvDdE4z0PZU9JdC1mVk1BU28/view?usp=sharing&resourcekey=0-rI8WqomT9R9kZACQz_7RHw
STEP 1:
Download the file at https://drive.google.com/file/d/0B5FQvDdE4z0PZU9JdC1mVk1BU28/view?usp=sharing&resourcekey=0-rI8WqomT9R9kZACQz_7RHw and upload it into Static Resources. Let's say we name the file as "CharCounter".
STEP 2:
Create a Visualforce Page with the code below.
Analyzing the code:
If you check the code, you could see that we have the 'styleclass' attribute specified for the inputtextarea's.
And this styleclass name is used in the document.ready() function to specify the character limits. You could use the 'id' attribute as well, but make sure you reference id's using the $Component notation.
I had a couple of Visualforce Page forms. Each form had multiple input boxes for the user to input information.
I had a save button at the top and bottom of the page. But still, sometimes the user might accidentally close or navigate to some other page.
Auto Saving the page in regular intervals was so nice to have. To do this we will use with a mix of Javascript and Apex.
Create a Visualforce Page with the code below.
Create an Apex Class with the code as given below.
I had a save button at the top and bottom of the page. But still, sometimes the user might accidentally close or navigate to some other page.
Auto Saving the page in regular intervals was so nice to have. To do this we will use
Create an Apex Class with the code as given below.
The below diagram is what we are going to build. This hierarchy is based upon the manager field in the user object. The below example is NOT based upon the role hierarchy. Anyhow, you can modify the code below to fit the role hierarchy.
Visualforce Page:
Visualforce Page:
<apex:page controller="orgchart" showHeader="false">
  <html>
  <head>
    <script type='text/javascript' src='https://www.google.com/jsapi'></script>
    <script type='text/javascript'>
      google.load('visualization', '1', {packages:['orgchart']});
      google.setOnLoadCallback(drawChart);
      function drawChart() {
        var data = new google.visualization.DataTable();
        data.addColumn('string', 'Name');
        data.addColumn('string', 'Manager');
        data.addColumn('string', 'ToolTip');

        data.addRows([

          {!userdata}

        ]);
        var chart = new google.visualization.OrgChart(document.getElementById('chart_div'));
        chart.draw(data, {allowHtml:true});
      }
    </script>
  </head>

  <body>

    <div id='chart_div' style="font-size:18px;"></div>
  </body>
</html></apex:page>
Apex Class
public class orgchart {

Public String getuserdata()
{
    List<User> allusers = [Select Name,Manager.Name from User where IsActive = TRUE and ManagerId != NULL];
    String datastr = '';
    for (integer i=0;i<allusers.size();i++)
    {
        datastr = datastr + '[\'';
        datastr += allusers[i].Name;
        datastr+= '\',\'';
        datastr+= allusers[i].Manager.Name;
        datastr+='\',\'\'],';
    }
    datastr = datastr + '';
    return datastr;

}
}
Force.com sites is a new concept released by salesforce. Under this concept, you can create public sites which can be accessed by anyone. You do not need a salesforce username and password to access a site.
Navigate to Set-up --> Develop --> Sites to create a new site. You will first have to register your force.com domain name. This domain name comes appended with the salesforce domain name. For ex: sfunearthed-developer-edition.na5.force.com
Once done, you can now create your site.
Security:
When you create a site , a profile with the name as site label is automatically created. So, users accessing your site would belong to this profile... You can view and edit the profile by clicking on "Public Access Settings" button on the site detail page...
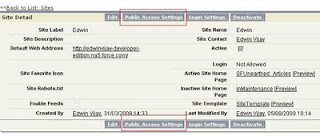
Using this profile you can grant access to objects, fields etc to be visible on the Site.
You will have to create a home page (Visualforce page) to set as the site home page.
After you have done all this, and when you view your site you may not see certain fields. This is mostly because of the security settings. The site profile has to be granted access in the "field level security" settings also. But, the Site profile does not appear in the list of profiles when you navigate to "Field level security". This is how you have to do it...
Navigate to the SITE Profile detail page by clicking on the "Public Access Settings" as shown above...
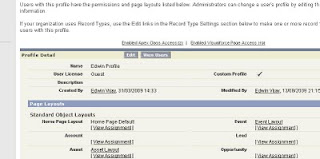
You can see a section called "Field level Settings"... Click on "View" against the desired object...
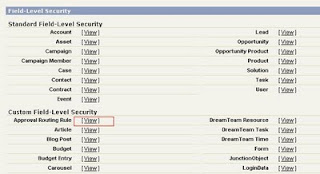
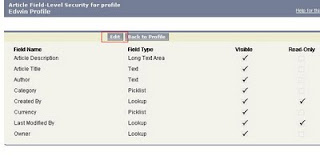
Click on "Edit" to edit the field level accessibility settings....
Cloud Developer challenge..
A month ago i signed up for the Cloud Developer challenge, but then i did not have time to create an amazing application nor did i have an idea... I was just longing for an idea and later dropped it...
But then the deadline was extended to August end 09.. by this time i realized that i finally got an idea.. More about that later..
So i signed up for the free 100 User force.com platform.. it was really amazing.. they offer you 1GB of storage free of cost.. the earlier developer editions used to have only 10MB.. 1GB is more than enough for a small organization to host its application on the force.com platform.. and remember "all free"....
I wanted to build an application which would be very colorful with lot of images (in short i wanted the application to have the salesforce look and feel 0%).... I am not an expert in HTML nor CSS but i was sure i knew the fundamentals...
W3Schools was the best and the fast.. U can learn HTML and CSS within hours...
Next, i wanted a template with the Images and all CSS styles.. I did not want to write down everything from scratch.. If you are an expert in that area and if you have experience in working with Dreamweaver or any such tools you can very well do that... These tools actually reduce your web pages development time drastically...
There are hundreds of websites which offer you free web templates... to name a few
http://www.2createawebsite.com/build/templates.html
http://www.freewebtemplates.com/
http://www.templatesbasket.com/
I downloaded a template from one such site.. Now i had all my images, CSS and a sample HTML file... I had to modify the file and insert Visualforce tags wherever applicable...
So, i logged into my force.com platform and created a SITE... Next i created a VisualForce page to use in the Site and OOPS!!! i found out that i couldn't create APEX Classes(Controller/Extension).. I was sure there should be some way out there and i posted it in the community.. And yes, there was a way.. You cannot create an Apex Class directly in the free platform, you will have to develop it in a developer ORG and deploy it into your free platform.. same as how you move code from test to production...
About the application i have started to develop...
I thought of extending this blog by making visitors contribute to this blog as well.. I could be doing something in ten steps which can be done by someone else in three or less steps.. So why not share ideas..
Meanwhile, i found this article very useful. It has been posted by Ron Hess. My application would be an extension upon this...
This article will expand as and when i encounter problems and solutions in my application development....
You can soon see a link in the sidebar pointing to the site :-) ... Hope i can have people to contribute articles...
Navigate to Set-up --> Develop --> Sites to create a new site. You will first have to register your force.com domain name. This domain name comes appended with the salesforce domain name. For ex: sfunearthed-developer-edition.na5.force.com
Once done, you can now create your site.
Security:
When you create a site , a profile with the name as site label is automatically created. So, users accessing your site would belong to this profile... You can view and edit the profile by clicking on "Public Access Settings" button on the site detail page...

Using this profile you can grant access to objects, fields etc to be visible on the Site.
You will have to create a home page (Visualforce page) to set as the site home page.
After you have done all this, and when you view your site you may not see certain fields. This is mostly because of the security settings. The site profile has to be granted access in the "field level security" settings also. But, the Site profile does not appear in the list of profiles when you navigate to "Field level security". This is how you have to do it...
Navigate to the SITE Profile detail page by clicking on the "Public Access Settings" as shown above...

You can see a section called "Field level Settings"... Click on "View" against the desired object...

Click on "Edit" to edit the field level accessibility settings....

Cloud Developer challenge..
A month ago i signed up for the Cloud Developer challenge, but then i did not have time to create an amazing application nor did i have an idea... I was just longing for an idea and later dropped it...
But then the deadline was extended to August end 09.. by this time i realized that i finally got an idea.. More about that later..
So i signed up for the free 100 User force.com platform.. it was really amazing.. they offer you 1GB of storage free of cost.. the earlier developer editions used to have only 10MB.. 1GB is more than enough for a small organization to host its application on the force.com platform.. and remember "all free"....
I wanted to build an application which would be very colorful with lot of images (in short i wanted the application to have the salesforce look and feel 0%).... I am not an expert in HTML nor CSS but i was sure i knew the fundamentals...
W3Schools was the best and the fast.. U can learn HTML and CSS within hours...
Next, i wanted a template with the Images and all CSS styles.. I did not want to write down everything from scratch.. If you are an expert in that area and if you have experience in working with Dreamweaver or any such tools you can very well do that... These tools actually reduce your web pages development time drastically...
There are hundreds of websites which offer you free web templates... to name a few
http://www.2createawebsite.com/build/templates.html
http://www.freewebtemplates.com/
http://www.templatesbasket.com/
I downloaded a template from one such site.. Now i had all my images, CSS and a sample HTML file... I had to modify the file and insert Visualforce tags wherever applicable...
So, i logged into my force.com platform and created a SITE... Next i created a VisualForce page to use in the Site and OOPS!!! i found out that i couldn't create APEX Classes(Controller/Extension).. I was sure there should be some way out there and i posted it in the community.. And yes, there was a way.. You cannot create an Apex Class directly in the free platform, you will have to develop it in a developer ORG and deploy it into your free platform.. same as how you move code from test to production...
About the application i have started to develop...
I thought of extending this blog by making visitors contribute to this blog as well.. I could be doing something in ten steps which can be done by someone else in three or less steps.. So why not share ideas..
Meanwhile, i found this article very useful. It has been posted by Ron Hess. My application would be an extension upon this...
This article will expand as and when i encounter problems and solutions in my application development....
You can soon see a link in the sidebar pointing to the site :-) ... Hope i can have people to contribute articles...
CSS stands for Cascading Style Sheets. This is nothing but a text file saved with the extension .css
This file will contain all the style defenitions for your visualforce page. To know the basics of styling your visualforce page visit this post.
Scenario 1:
We are going to take a very simple scenario. You want all your <h1> tags to appear in GREEN color.
Step 1:
Create a CSS file.
Open NOTEPAD or any text editor and type the following code
Save the file with a .css extension (say CssExample.css)
Step 2:
Upload the saved file as a Static resource.
Setup -> Develop -> Static Resources and click on NEW.
Give a name for the static resource say CssExample. Remeber to set the Cache Control as "Public".
Step 3:
Create a visualforce page and paste the following code..
Save the page. Now you can see that the text within <h1> tag is displayed in GREEN color because you have specified so in the CSS file.
TiP: Remove showheader="false" and you can see that the text is displayed in normal size and not h1. This is because the header uses standard salesforce style sheets and your visualforce page is still overridden with this even if you say ' standardstylesheets="false" '. To overcome this use font-size:15px or whatever it maybe.
Scenario 2:
Now lets modify the CSS. We will have two commandbuttons and one commandlink. We will add a background color and text color to one button and a different color to another button. We will also change the color of commandlink.
Modify the CSS as below...
Upload the modified CSS into Static resource. You can edit the already created static resource CssExample and just choose the latest file from your desktop.
Modify the Visualforce page as below..
Now you can see the different colours that we have applied...
Look at the CSS code carefully. We have two classes button1 and button2 with their style defenitions (note that .button1 is the way the classes have to be defined in CSS).
When your Visualforce page is finally rendered as HTML commandlink tag will be converted to <a> tag. That's why we define the colors for "a" in CSS. a:hover represents the styling to be used when you move your mouse on the commandlink..
Scenario 3:
The method i am describing below is the most inefficient one. I later discovered that there is a very easy way... You can find it here
Sorry for the inconvenience.. but still i thought mentioning the below method maybe of use somewhere
Specifying a background image in the CSS. We will add a background image to the commandbutton and more styling effects.. Save the following images to your desktop.
 (bg_button_a.gif) Right-click and Save Image As
 (bg_button_span.gif) Right-click and Save Image As
Now we have the CSS code as below..
The colored parts in the code refer to the URL of the images. When you upload this CSS to Salesforce, the URL is no longer valid. Hence the CSS has to be modified.
Upload the two images into SFDC as static resources (Save the first one as ButtonBg and the second one as ButtonBgSpan for example). View the details of the static resource created. Click on "Click here to view this file".
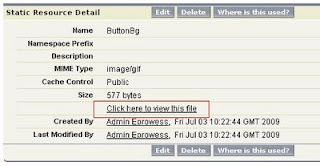
After you click the image opens up in a new window/tab. Now check the URL. For me the URL was
https://ap1.salesforce.com/resource/1246616624000/ButtonBgSpan
You have to copy the coloured part of the URL and paste it in the CSS . Do it for the two files uploaded. Now the modified CSS looks like this...
Upload this updated CSS . You can edit your already created Static resource CssExample and just choose the latest file from your desktop.
The Visualforce page code will be..
That's it... Now you can see the effects you have just created
Comments and suggestions welcome!!
This file will contain all the style defenitions for your visualforce page. To know the basics of styling your visualforce page visit this post.
Scenario 1:
We are going to take a very simple scenario. You want all your <h1> tags to appear in GREEN color.
Step 1:
Create a CSS file.
Open NOTEPAD or any text editor and type the following code
h1
{
color:green;
}
Save the file with a .css extension (say CssExample.css)
Step 2:
Upload the saved file as a Static resource.
Setup -> Develop -> Static Resources and click on NEW.
Give a name for the static resource say CssExample. Remeber to set the Cache Control as "Public".
Step 3:
Create a visualforce page and paste the following code..
<apex:page standardstylesheets="false" showheader="false">
<apex:stylesheet value="{!$Resource.CssExample}"/>
<h1> This text is displayed using CSS </h1>
</apex:page>
Save the page. Now you can see that the text within <h1> tag is displayed in GREEN color because you have specified so in the CSS file.
TiP: Remove showheader="false" and you can see that the text is displayed in normal size and not h1. This is because the header uses standard salesforce style sheets and your visualforce page is still overridden with this even if you say ' standardstylesheets="false" '. To overcome this use font-size:15px or whatever it maybe.
Scenario 2:
Now lets modify the CSS. We will have two commandbuttons and one commandlink. We will add a background color and text color to one button and a different color to another button. We will also change the color of commandlink.
Modify the CSS as below...
h1
{
color:green;
}
.button1
{
background-color:#00FF00;
font-weight:bold;
color:#E56717;
}
.button2
{
background-color:#C12283;
font-weight:bold;
color:#EE9A4D;
}
a:hover
{
color:#F665AB;
}
a
{
color:#52D017;
font-size:20px;
}
Upload the modified CSS into Static resource. You can edit the already created static resource CssExample and just choose the latest file from your desktop.
Modify the Visualforce page as below..
<apex:page standardstylesheets="false" showHeader="false">
<apex:form >
    <apex:stylesheet value="{!$Resource.CssExample}"/>
    <h1> This text is displayed using CSS </h1>
        <apex:commandButton styleclass="button1" value="Click Me!"/>
        <apex:commandButton styleclass="button2" value="Click Me!"/>
        <apex:commandlink value="Clik me!"/>
    </apex:form>
</apex:page>
Now you can see the different colours that we have applied...
Look at the CSS code carefully. We have two classes button1 and button2 with their style defenitions (note that .button1 is the way the classes have to be defined in CSS).
When your Visualforce page is finally rendered as HTML commandlink tag will be converted to <a> tag. That's why we define the colors for "a" in CSS. a:hover represents the styling to be used when you move your mouse on the commandlink..
Scenario 3:
The method i am describing below is the most inefficient one. I later discovered that there is a very easy way... You can find it here
Sorry for the inconvenience.. but still i thought mentioning the below method maybe of use somewhere
Specifying a background image in the CSS. We will add a background image to the commandbutton and more styling effects.. Save the following images to your desktop.
 (bg_button_a.gif) Right-click and Save Image As
 (bg_button_span.gif) Right-click and Save Image As
Now we have the CSS code as below..
.clear { /* generic container (i.e. div) for floating buttons */
  overflow: hidden;
  width: 100%;
}

a.button {
  background: transparent url('bg_button_a.gif') no-repeat scroll top right;
  color: #444;
  display: block;
  float: left;
  font: normal 12px arial, sans-serif;
  height: 24px;
  margin-right: 6px;
  padding-right: 18px; /* sliding doors padding */
  text-decoration: none;
}

a.button span {
  background: transparent url('bg_button_span.gif') no-repeat;
  display: block;
  line-height: 14px;
  padding: 5px 0 5px 18px;
}
a.button:active {
  background-position: bottom right;
  color: #000;
  outline: none; /* hide dotted outline in Firefox */
}

a.button:active span {
  background-position: bottom left;
  padding: 6px 0 4px 18px; /* push text down 1px */
}
The colored parts in the code refer to the URL of the images. When you upload this CSS to Salesforce, the URL is no longer valid. Hence the CSS has to be modified.
Upload the two images into SFDC as static resources (Save the first one as ButtonBg and the second one as ButtonBgSpan for example). View the details of the static resource created. Click on "Click here to view this file".

After you click the image opens up in a new window/tab. Now check the URL. For me the URL was
https://ap1.salesforce.com/resource/1246616624000/ButtonBgSpan
You have to copy the coloured part of the URL and paste it in the CSS . Do it for the two files uploaded. Now the modified CSS looks like this...
.clear
{ /* generic container (i.e. div) for floating buttons */
   overflow: hidden;
   width: 100%;
}

a.button {
   background: transparent url('/resource/1246616564000/ButtonBg') no-repeat scroll top right;
   color: #444;
   display: block;
   float: left;
   font: normal 12px arial, sans-serif;
   height: 24px;
   margin-right: 6px;
   padding-right: 18px; /* sliding doors padding */
   text-decoration: none;
}

a.button span
{
   background: transparent url('/resource/1246616624000/ButtonBgSpan') no-repeat;
   display: block;
   line-height: 14px;
   padding: 5px 0 5px 18px;
}
a.button:active
{
   background-position: bottom right;
   color: #000;
   outline: none; /* hide dotted outline in Firefox */
}

a.button:active span
{
   background-position: bottom left;
   padding: 6px 0 4px 18px; /* push text down 1px */
}
Upload this updated CSS . You can edit your already created Static resource CssExample and just choose the latest file from your desktop.
The Visualforce page code will be..
<apex:page standardstylesheets="false" showHeader="false">
   <apex:form >
       <apex:stylesheet value="{!$Resource.CssExample}"/>
           <apex:commandlink styleclass="button"><span> Save </span> </apex:commandlink>
           <apex:commandlink styleclass="button"><span> Cancel </span> </apex:commandlink>
       </apex:form>
</apex:page>
That's it... Now you can see the effects you have just created
Comments and suggestions welcome!!
Many a times we come across situations in which we want data to be added to a picklist dynamically.
By saying dynamic i mean that you do not want an Administrator to go to the field level setup and add values to the picklist...
Here is a detailed description of a scenario from one of my friends...
Scenario..
Problem explanation with Example: A picklist field "City" with values:Delhi,Mumbai,Chennai,Kolkata(4 picklist values) and a textbox nearby to enter any other city. Supposing if Bangalore has to be entered, the user has to use the textbox. Now next time when a record is created, the "City" field should show "Bangalore" as 5th value.
Screenshots:
As you can see below, there are only three values available for selection.
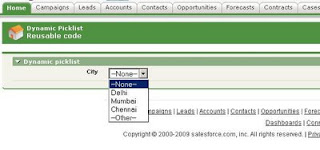
I am selecting 'Other' from the dropdown, this action displays a text box for the new value and a button called "Add".
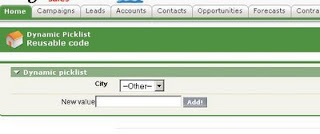
I am entering a new value called "Bangalore" and i am clicking on "Add"
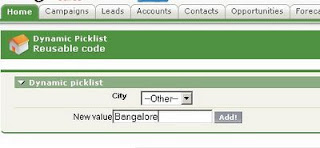
Done!! Now you can see that the new value "Bangalore" is also added to the dropdown..
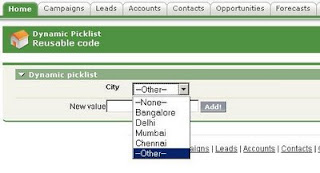
We will achieve this functionality using visualforce. You can then extend the code provided here to as many Visualforce pages as you want.
Step 1:
First of all, we will have to create an object to hold all the picklist values. So, go ahead and create the following..
Object name : DynamicPicklist
Field Names:
Name (Datatype : Autonumber)
PicklistValue (Datatype: text)
Step 2:
Add picklist values to the object created.. (ie) Add records to the newly created object...
For example..
Record 1: PicklistValue= 'Delhi'
Record 2: PicklistValue = 'Mumbai'
and so on...........
Now also add a value called '--Other--'. This value will be used for the user to enter a new value.
Step 3:
Creation of the Visualforce page and the Apex Class.
Apex Code.. Save this first
Visualforce code...
How to extend this code???
Are you wondering if you will have to create one object for one picklist and suppose you have ten picklists like these, then ten objects... That is really a mess...
So, why not create ten fields in the same object.. Field1 represents picklist1, field2 picklist2 and so on...
But, be clear on the way you retrieve values and insert values into this object... For ex: I have not performed the validation to check if the newly entered value already exists..
Comments and Queries most welcome!!!!
By saying dynamic i mean that you do not want an Administrator to go to the field level setup and add values to the picklist...
Here is a detailed description of a scenario from one of my friends...
Scenario..
Problem explanation with Example: A picklist field "City" with values:Delhi,Mumbai,Chennai,Kolkata(4 picklist values) and a textbox nearby to enter any other city. Supposing if Bangalore has to be entered, the user has to use the textbox. Now next time when a record is created, the "City" field should show "Bangalore" as 5th value.
Screenshots:
As you can see below, there are only three values available for selection.

I am selecting 'Other' from the dropdown, this action displays a text box for the new value and a button called "Add".

I am entering a new value called "Bangalore" and i am clicking on "Add"

Done!! Now you can see that the new value "Bangalore" is also added to the dropdown..

We will achieve this functionality using visualforce. You can then extend the code provided here to as many Visualforce pages as you want.
Step 1:
First of all, we will have to create an object to hold all the picklist values. So, go ahead and create the following..
Object name : DynamicPicklist
Field Names:
Name (Datatype : Autonumber)
PicklistValue (Datatype: text)
Step 2:
Add picklist values to the object created.. (ie) Add records to the newly created object...
For example..
Record 1: PicklistValue= 'Delhi'
Record 2: PicklistValue = 'Mumbai'
and so on...........
Now also add a value called '--Other--'. This value will be used for the user to enter a new value.
Step 3:
Creation of the Visualforce page and the Apex Class.
Apex Code.. Save this first
public class dynamicpicklist
{
public String city{get; set;}

public List<SelectOption> getcitynames()
{
  List<SelectOption> options = new List<SelectOption>();
  List<DynamicPicklist__c> citylist = new List<DynamicPicklist__c>();
  citylist = [Select Id, PicklistValue__c FROM DynamicPicklist__c ];
  options.add(new SelectOption('--None--','--None--'));
  for (Integer j=0;j<citylist.size();j++)
  {
      options.add(new SelectOption(citylist[j].PicklistValue__c,citylist[j].PicklistValue__c));
  }
  return options;
}
public String newpicklistvalue{get; set;}

public void saverec()
{
  DynamicPicklist__c newrec = new DynamicPicklist__c(PicklistValue__c=newpicklistvalue);
  insert newrec;
  newpicklistvalue=NULL;
}

}
Visualforce code...
<apex:page controller="dynamicpicklist" sidebar="false" >
<apex:form >
<apex:sectionHeader title="Dynamic Picklist" subtitle="Reusable code"/>
<apex:pageblock >
<apex:pageBlockSection title="Dynamic picklist" columns="1">
      <apex:pageblocksectionItem >
          <apex:outputlabel value="City" for="values" />
          <apex:selectList value="{!city}" size="1" id="values">
              <apex:actionSupport event="onchange" reRender="newvalue" />
              <apex:selectOptions value="{!citynames}"/>
          </apex:selectList>
      </apex:pageblocksectionItem>
          <apex:outputpanel id="newvalue">
             <apex:outputpanel rendered="{!city == '--Other--'}">
             <div style="position:relative;left:75px;">
                  <apex:outputlabel value="New value" for="newval" />
                  <apex:inputText value="{!newpicklistvalue}" id="newval"/>
                  <apex:commandbutton action="{!saverec}" value="Add!"/>
             </div>
             </apex:outputpanel>
          </apex:outputpanel>
  </apex:pageblocksection>
</apex:pageblock>
</apex:form>
</apex:page>
How to extend this code???
Are you wondering if you will have to create one object for one picklist and suppose you have ten picklists like these, then ten objects... That is really a mess...
So, why not create ten fields in the same object.. Field1 represents picklist1, field2 picklist2 and so on...
But, be clear on the way you retrieve values and insert values into this object... For ex: I have not performed the validation to check if the newly entered value already exists..
Comments and Queries most welcome!!!!
Hello ppl,
Post your questions on Visualforce development and any other related topics on Salesforce that you need quick help with.
Expect the quickest of quick response!!!
Post your questions on Visualforce development and any other related topics on Salesforce that you need quick help with.
Expect the quickest of quick response!!!


